
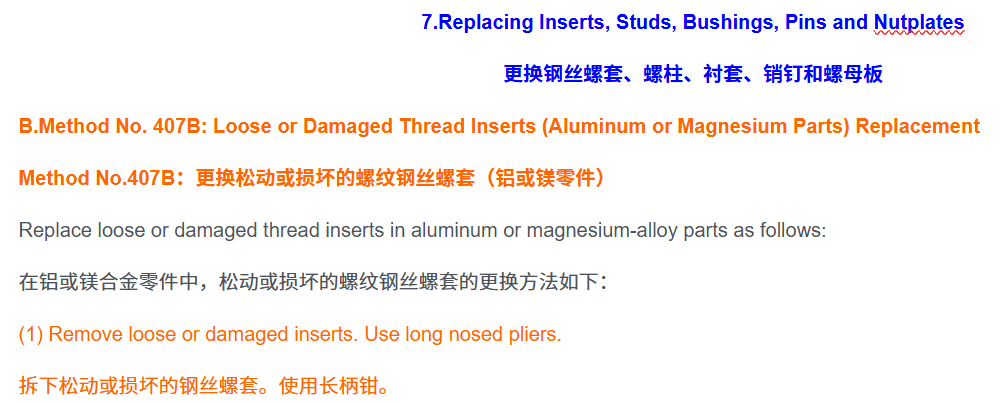
7.Replacing Inserts, Studs, Bushings, Pins and Nutplates
更换钢丝螺套、螺柱、衬套、销钉和螺母板
NOTE: Refer to Method No. 415A, and 415B for repairing damaged/oversized diameters with inserts.
注:若需使用钢丝螺套修复受损或过大的直径,请参阅Method No.415A和415B。
A.Method No. 407A: Loose or Damaged Thread Inserts Replacement
Method No. 407A:松动或损坏螺纹钢丝螺套更换
Step (1) describes the repair of non-Keensert thread inserts, and Step (2) describes the repair of Keensert thread inserts.
步骤(1)描述了非Keensert螺纹钢丝螺套的修复,步骤(2)描述了Keensert螺纹衬套的修复。
(1) Remove and replace non-Keensert thread inserts as follows:
按如下方法移除并更换非Keensert螺纹钢丝螺套:
(a) Remove loose or damaged inserts. Use long-nosed pliers.
拆下松动或损坏的钢丝螺套。使用长柄钳。
WARNING: SOLVENT VAPORS ARE TOXIC AND FLAMMABLE. DO NOT INHALE VAPORS OBSERVE FIRE PRECAUTIONS.
警告:溶剂蒸气有毒且易燃。请勿吸入蒸气,注意防火。
(b) Clean hole from which insert was removed. Use degreasing solvent C04-0025. Remove corrosion if present.
清理要取出钢丝螺套的孔,使用脱脂溶剂C04-0025,如有腐蚀需清除。
(c) Apply a thin even coat of primer C03-0007 to threaded area in which new insert is to be installed.
在需安装新钢丝螺套的螺纹区域均匀涂抹一层薄薄的C03-0007底漆。
NOTE: Refer to applicable manual to verify type of primer required.
注:请参阅适用手册以验证所需底漆类型。
(d) Install new insert three-quarters to one and one-half turns below surface of countersink. Remove tang, if applicable. Use long-nosed pliers or blunt tool and hammer.
安装新钢丝螺套,使其置于沉头孔表面下方四分之三至一个半圈处。若适用,需先拆下卡舌。使用长柄钳或钝头工具配合锤子进行操作。
NOTE: To install new insert, use a modified screwdriver, or a rod, with the correct outside diameter to fit inside diameter of insert and slotted to fit over tang of insert.
注意:安装新钢丝螺套时,需使用经过改装的螺丝刀或专用杆件,其外径需与插入件内径匹配,并带槽口以便套入钢丝螺套的卡舌。
(2) Remove and replace loose or damaged Keensert thread inserts as follows:
按如下步骤拆卸并更换松动或损坏的Keensert螺纹钢丝螺套:
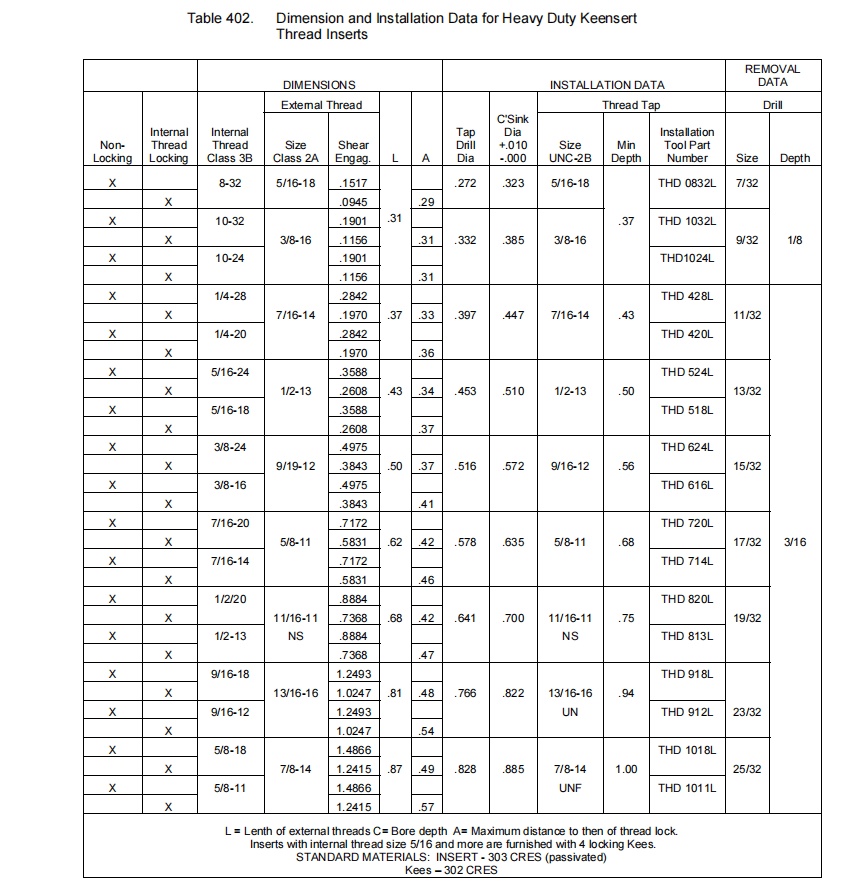
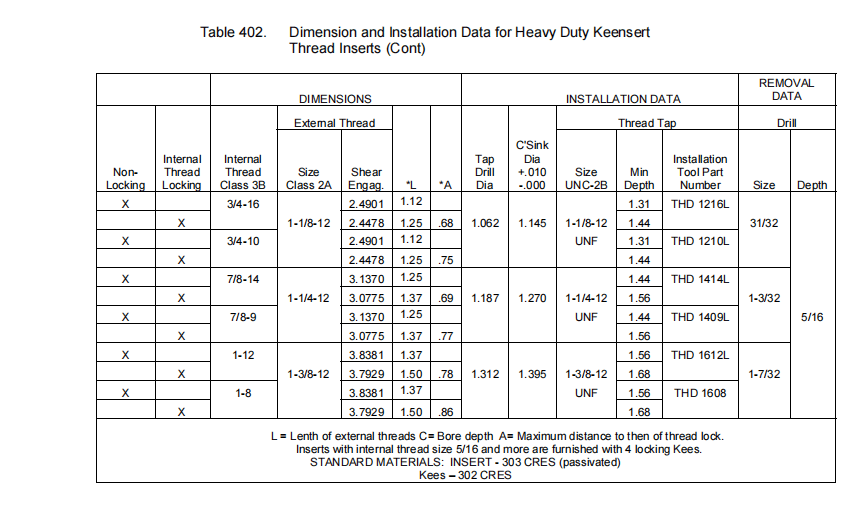
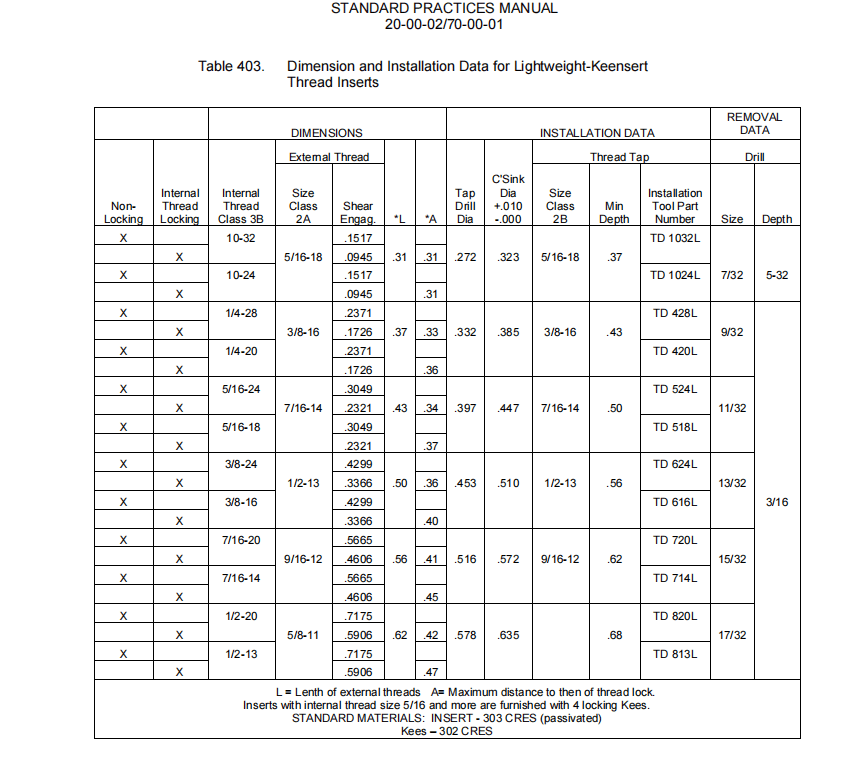
NOTE: Refer to Table 402 and Table 403 for Keensert dimensions and installation data.
注:Keensert尺寸和安装数据请参考表402和表403。
CAUTION: DO NOT PERMIT THE DRILL TO TOUCH HOUSING OR DAMAGE CAN RESULT.
注意:切勿让钻头接触外壳,否则可能导致损坏。
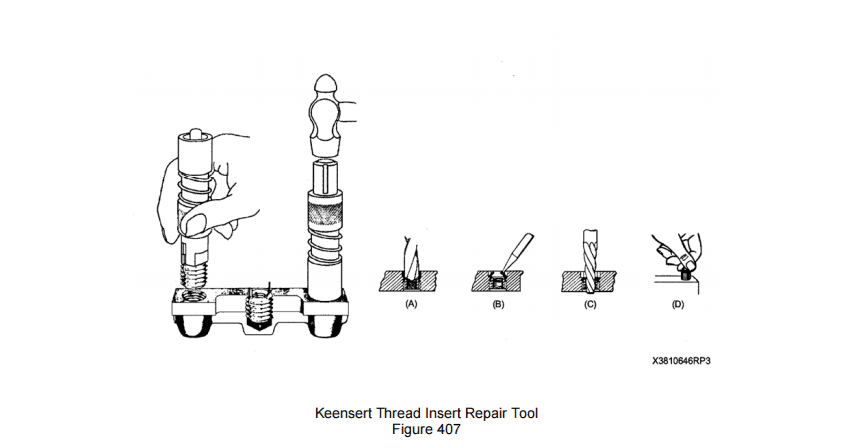
(a) Remove insert material between Kees. Use a standard drill. Refer to Figure 407.
在Kees之间移除钢丝螺套。使用标准钻头。参见图407。
(b) Bend Kees inward and break off. Refer to Figure 407.
弯曲Kees向内并断裂。参见图407。
(c) Remove insert with an “easyout” type tool. Refer to Figure 407.
使用“easyout”类型的工具移除钢丝螺套。请参见图407。
WARNING: SOLVENT VAPORS ARE TOXIC AND FLAMMABLE. DO NOT INHALE VAPORS. OBSERVE FIRE PRECAUTIONS.
警告:溶剂蒸气有毒且易燃。请勿吸入蒸气。注意防火措施。
WARNING: USE THE CORRECT PERSONAL PROTECTION. COMPRESSED AIR WILL CAUSE LOOSE PARTICLES THAT CAN GET IN YOUR EYES. COMPRESSED AIRFLOW CAN CAUSE CUTS, DO NOT POINT IT AT YOUR SKIN.
警告:请使用正确的个人防护装备。压缩空气会携带松散颗粒,可能进入眼睛;气流可能造成割伤,请勿对准皮肤。
(d) Clean hole to remove unwanted material with compressed air at 20 psig (137.89 kPa) maximum.
用20 psig(最大137.89 kPa)的压缩空气吹扫孔洞,清除不需要的材料。
(e) Apply a thin even coat of primer C03-0007 to threaded area in which new insert is to be installed.
在需安装新钢丝螺套的螺纹区域均匀涂抹一层薄薄的C03-0007底漆。
NOTE: Refer to applicable manual to verify type of primer required.
注:请参阅适用手册以验证所需底漆类型。
(f) Install new insert with fingers or use an insert tool. Refer to Table 402 or Table 403 to identify the correct insert tool. Use insert tool to drive in the Kees. Refer to Figure 407.
用手指安装新钢丝螺套,或使用钢丝螺套工具。请参考表402或表403以确定正确的钢丝螺套工具。使用钢丝螺套工具将Kees插入。请参考图407。
(g) If the receiving holes should become damaged, use a larger outside diameter replacement insert while keeping original bolt size.
若底孔出现损坏,应更换外径更大的替换件,同时保持原螺栓尺寸不变。


暂无评论内容