5. Torque Requirements 扭矩要求
Torque requirements for air, oil and fuel system components depend on the type of parts being fastened or tightened.
空气、滑油及燃油系统组件的扭矩要求取决于紧固或拧紧的零件类型。
NOTE: The terms torquing and tightening are interchangeable in this task.
注:本任务中扭矩与紧固术语可互换使用。
通用扭矩要求
This general practice applies to torquing bolts and screws when flanges are metal-to-metal.
此通用规范适用于金属对金属法兰连接中的螺栓与螺钉扭矩操作。
WARNING: SOLVENT VAPORS ARE TOXIC AND FLAMMABLE. DO NOT INHALE VAPORS. OBSERVE FIRE PRECAUTIONS.
警告:溶剂蒸气具有毒性且易燃。切勿吸入蒸气。遵守防火安全措施。
CAUTION: WHEN FLANGES INCLUDE GASKET MATERIAL, INITIAL TORQUING OR TIGHTENING SHALL BE AT 60 PERCENT OF SPECIFIED TORQUE OR AS LISTED IN TABLES.
注意:法兰含垫片材料时,初始扭矩应为规定值的60%或按表格列示值执行。
(1) Clean threads using solvent (Federal Specification P-D-680, Type I/II/III) (SECTION VII) and remove corrosion if present.
使用溶剂(联邦规范P-D-680,I/II/III型)(SECTION VII)清洁螺纹,清除腐蚀物(如有)。
(2) Free threads of nicks and burrs.
去除螺纹上的缺口和毛刺。
(3) Apply a light coat of anti-seize lubricant to fittings prior to assembly.
组装前在接头上涂抹薄层防咬剂。
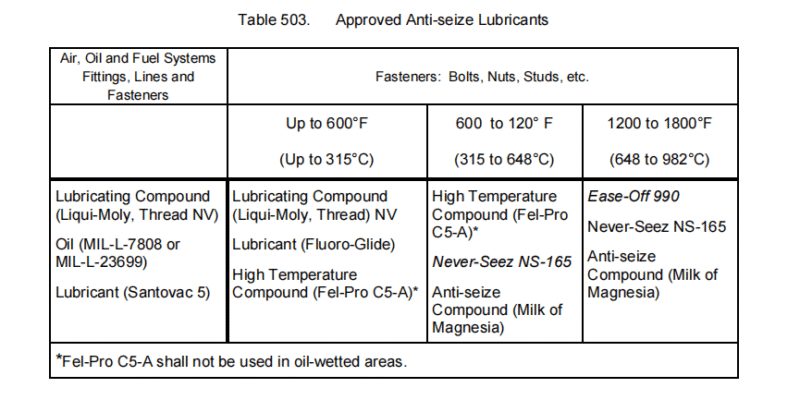
NOTE: Table 503 identifies Honeywell approved anti-seize lubricants for threaded fasteners and fittings, depending on the service temperature and the fluid contacted. Only anti-seize lubricants shown in Table 503 shall be used unless otherwise approved by Honeywell.
注:表503列出了霍尼韦尔批准的螺纹紧固件及接头用防咬剂,选择依据为工作温度及接触流体类型。除非获得霍尼韦尔特别批准,仅可使用表503所示防咬剂。
![图片[1]-SECTION IV – ASSEMBLY 5 -扭矩要求-航修札记](https://www.aeroacm.com/wp-content/uploads/2025/11/20251122230018817-图片1.png)
(4) Position mating flanges in specified assembly position. Preposition bolts or studs before beginning the torquing sequence.
将配合法兰置于规定组装位置。开始扭矩拧紧程序前预安装螺栓或螺柱。
CAUTION: REFER TO APPLICABLE ASSEMBLY MANUAL, OR TO FIGURE 503 AS NEEDED, FOR PROPER, SPECIFIED TORQUING SEQUENCES.
注意:请参照适用组装手册或图503确认正确的规定扭矩顺序。
(5) For first sequence, apply approximately 25 to 50 percent of the maximum torque level uniformly for each bolt.
首轮拧紧时,每根螺栓均匀施加约25%至50%的最大扭矩值.
NOTE: For additional intermediate sequences apply torque levels proportionally between 25 to 50 percent of the maximum specified.
注:后续中间顺序应按最大扭矩值的25%至50%比例施加扭矩。
(6) For final sequence, apply maximum allowed for the specific bolts being used.
最终顺序中,对特定螺栓施加允许的最大扭矩值。
![图片[2]-SECTION IV – ASSEMBLY 5 -扭矩要求-航修札记](https://www.aeroacm.com/wp-content/uploads/2025/11/20251122230047329-图片2.png)
(7) Acceptable torque wrench types include the following and shall be certified, identified, and calibrated periodically.
可接受的扭矩扳手类型如下,且须定期进行认证、标识和校准:
• Dial indicator type.
• 指针式
• Micrometer adjustable click type.
• 微米可调式
• Preset click type.
• 预设式
(a) These may be used in conjunction with a crow’s foot or box socket. When an extension is used with the wrench, the readings must be decreased by a factor. If the crow’s foot or extension is at 90°, no calculation is required (E = 0). The following formula provides the correct scale reading:
可配合crow扳手或套筒使用。使用扳手延长杆时,读数需按系数折算。若crow扳手或延长杆呈90°角,无需计算(E=0)。正确读数计算公式如下:
R = (TL) ÷ (L + E)
Where:
其中:
R = Reading on torque wrench scale
R = 扭矩扳手读数
T = Applied torque or actual torque
T = 施加扭矩或实际扭矩
L = Effective length of wrench lever arm (see below)
L = 扳手杆臂有效长度(见下文)
E = Effective length of extension (see below)
E = 延长杆有效长度(见下文)
(b) A proper wrench for desired torque ranges shall be used. Recommended torque wrench sizes are as follows:
须选用适用于目标扭矩范围的专用扳手。推荐扭矩扳手规格如下:
![图片[3]-SECTION IV – ASSEMBLY 5 -扭矩要求-航修札记](https://www.aeroacm.com/wp-content/uploads/2025/11/20251122230117891-图片3.png)
操作规程- 紧固件准备与安装(标准车间操作)
WARNING: SOLVENT VAPORS ARE TOXIC AND FLAMMABLE. DO NOT INHALE VAPORS. OBSERVE FIRE PRECAUTIONS.
警告:溶剂蒸气具毒性且易燃。切勿吸入蒸气。遵守防火措施。
CAUTION: WHEN FLANGES INCLUDE GASKET MATERIAL, INITIAL TORQUE OR TIGHTENING SHALL BE AT 60 PERCENT OF SPECIFIED OR AS LISTED IN TABLES.
注意:法兰带垫片时,初始扭矩或紧固扭矩应为规定值的60%或按表格列示值执行。
(1) Clean threads using solvent (Federal Specification P-D-680, Type I/II/III) (SECTION VII) and remove corrosion if present.
用溶剂(联邦规范P-D-680,I/II/III型)(SECTION VII)清洁螺纹,清除腐蚀物(如有)。
(2) Free threads of nicks and burrs.
去除螺纹上的缺口和毛刺。
(3) Apply a light coating of anti-seize lubricant to fittings prior to assembly.
组装前在管件上涂抹薄层防咬剂。
NOTE: Table 503 identifies Honeywell approved anti-seize lubricants for threaded fasteners and fittings, depending on the service temperature and the fluid contacted. Only anti-seize lubricants shown in Table 503 shall be used unless otherwise approved by Honeywell.
注:表503列出了霍尼韦尔批准的适用于螺纹紧固件和管件的防咬剂,选择依据为工作温度和接触流体类型。除非获得霍尼韦尔另行批准,否则仅可使用表503所示防咬剂。
(4) Tighten fasteners installed through inelastic boundaries as follows:
紧固穿过非弹性边界的紧固件时,按以下步骤操作:
(a) Tighten each fastener until there is no visible clearance between parts.
逐个紧固件直至零件间无可见间隙。
NOTE: During the initial tightening run-down resistance shall be noted on the last rotation before establishing tensile preload in the fastener.
注:初始紧固过程中,应记录紧固件建立拉伸预紧力前最后一次旋转时的阻力值。
(b) Apply additional tightening evenly to produce the final torque value specified in Table 504.
均匀追加紧固力,使最终扭矩值达到表504规定数值。
(5) Tighten nuts and bolts installed through faying surface joints or sealed with a diaphragm, o-ring, or similar elastomeric gasket as follows:
紧固通过配合面接头安装或采用膜片、O型圈或相似弹性垫片密封的螺母螺栓时,应按以下步骤操作:
(a) Torque nuts and bolts to equal values to obtain pressure-tight seal.
将螺母螺栓拧至等值扭矩以获得压力密封。
(6) Tighten nuts and bolts installed through flanges with gasket material as follows:
通过法兰安装并使用垫片材料的螺栓螺母紧固程序如下:
(a) Apply initial torque at 60 percent of the final torque value specified, or listed in Table 504.
初始扭矩施加值为最终扭矩值(或表504所列值)的60%。
(b) Apply torque at 100 percent of final torque value.
扭矩施加值为最终扭矩值的100%。
(7) Retighten tubing connections as follows:
重新紧固管路连接如下:
NOTE: All tubing connections shall be torqued during the assembly and prior to functional testing of a unit. If for any reason, personnel loosen or disconnect tubing, the connection shall be retorqued to the required value with a calibrated torque wrench.
注:所有管路连接均应在部件组装期间及功能测试前进行扭矩紧固。若因故松动或断开管路连接,须使用校准扭矩扳手将连接处重新紧固至规定值。
(a) Using a calibrated torque wrench, tighten connections to conform to the specified torque values.
使用校准过的扭矩扳手将连接处紧固至规定扭矩值。
![图片[4]-SECTION IV – ASSEMBLY 5 -扭矩要求-航修札记](https://www.aeroacm.com/wp-content/uploads/2025/11/20251122230340989-图片4-861x1024.png)
组装扭矩值指南(螺母、螺栓、螺钉、螺柱及钢丝螺套)
NOTE: Table 506, Table 507, and Table 508 list assembly torque values based on service requirements for A286 heat-resisting alloy steel or equivalent fastener material with lubricated threads. Torque values specified are in addition to frictional torques developed by self-locking devices. Table 509 lists the assembly torque values for drain, fill, and sight glass plugs.
注:表506、表507及表508所列组装扭矩值基于A286耐热合金钢或同等紧固件材料(螺纹经润滑处理)的使用要求。所列扭矩值不包含自锁装置产生的摩擦扭矩。表509列出排污、注油及视镜塞的组装扭矩值。(最后一句不确定)
Unless specified otherwise in tables, use tolerance values as follows:
除非表格另有规定,请按以下公差值使用:
• Zero to 1200 inch-pounds, ±2½% (0 – 135.6 Nm)
• 0至1200英寸磅:±2½%(0-135.6牛米)
• Over 1200 inch-pounds, ±3% (Over 135.6 Nm)
• 超过1200英寸磅:±3%(超过135.6牛米)
When a torque wrench calibrated with SI units will be used to torque a bolt, nut, screw or other component, select a torque wrench where the required torque value is within the range of the torque wrench. Set the torque wrench value nearest to the required value based on the torque wrench scale.
使用经SI单位校准的扭矩扳手拧紧螺栓、螺母、螺钉或其他部件时,应选择所需扭矩值在该扳手量程范围内的型号。根据扭矩扳手刻度盘设定最接近所需值的扭矩数值。
For example:
例如:
• Torque requirement in manual: 50 inch-pounds (5.7 Nm)
• 手册要求扭矩:50 inch-pounds (5.7 Nm)
• Torque wrench specification:
• 扭矩扳手规格:
Range: 4 to 12 Nm
量程:4-12Nm
Scale: 0.2 Nm
刻度:0.2Nm
• Torque wrench setting: 5.6 or 5.8 Nm
• 扭矩扳手设定值:5.6-5.8Nm
NOTE: Where two torque values are included, use the smaller one when the nut is torqued and the bolt is held stationary. Use the larger value when the bolt is torqued and the nut is held stationary. Studs which have a different thread size on opposite ends shall be torqued to the smaller size regardless of which end is fitted into the installation. When the use of Hylomar is specified, multi-bolted flanges shall be retorqued to original values after a 10-minute waiting period.
注:当存在两个扭矩值时,若螺母拧紧而螺栓固定,应采用较小值。当螺栓拧紧而螺母固定不动时,则采用较大数值。两端螺纹规格不同的螺柱,无论安装时哪端插入,均应按较小规格扭矩拧紧。当规定使用Hylomar密封剂时,多螺栓法兰在等待10分钟后应重新拧紧至原始扭矩值。
Application examples for Table 506, Table 507, Table 508, and Table 509 torque values follow:
表506、表507、表508及表509扭矩值的应用示例如下:
• Table 506-Highly loaded connections; generally in specialized regions of the turbine such as steel-to-steel environment or joints directly exposed to rotor bearing dynamic forces. Specific applications include.
• 表506-高负荷连接件;通常用于涡轮机特殊区域,如钢-钢接触环境或直接承受转子轴承动态力的接头。具体应用包括:
− Turbine plenum-diffuser flanges
− 涡轮增压-扩压法兰
− Turbine plenum-bearing flanges
− 涡轮增压-轴承法兰
− Turbine stator flanges
− 涡轮定子法兰
− Turbine bearing carrier-bearing capsule flanges
− 涡轮轴承支架-轴承舱法兰
• Table 507-Moderately loaded connections; generally aluminum joints, magnesium joints, aluminum or magnesium-to-steel joints in the compressor, gearbox, or accessory region of gas turbines. Some specific applications are.
• 表507-中等负荷连接;通常适用于燃气轮机压缩机、齿轮箱或附件区域的铝合金接头、镁合金接头、铝/镁合金与钢材的连接。具体应用包括:
− Diffuser-gearbox flanges
− 扩压器-齿轮箱法兰
− Accessory cases-gearbox flanges
− 附件箱-齿轮箱法兰
− Mounting flanges for accessories gearing
− 附件齿轮安装法兰
− Compressor, diffuser, and shroud flanges
− 压缩机、扩压器及整流罩法兰
• Table 508-Lightly loaded connections; generally for clips and brackets. Torques may be used for nuts and a bolt installed on key- or ring-locked studs or inserts in magnesium for lightly loaded joints.
• 表508-轻载连接;通常适用于卡箍和支架。对于螺母及安装在镁合金键锁/环锁螺柱或嵌件上的螺栓,轻载接头可采用扭矩值。
• Table 509-The minimum torque value must be used to seat the O-ring seal into the internal port. Do not exceed the maximum torque value or damage to the plug or threads can occur. For aluminum parts the safety factor is almost 1.5 times the maximum torque. The same maximum torque is recommended for stainless steel, however the safety factor will be higher.
• 表509-必须使用最小扭矩值将O型圈密封件压入内孔。切勿超过最大扭矩值,否则可能损坏堵头或螺纹。铝制零件的安全系数接近最大扭矩的1.5倍。不锈钢零件推荐使用相同最大扭矩值,但安全系数将更高。
• Special thin wall plugs require special torque specifications. Refer to the applicable manual for the unit in work.
• 特殊薄壁堵头需遵循专用扭矩规范。请参照所用部件的适用手册。
![图片[5]-SECTION IV – ASSEMBLY 5 -扭矩要求-航修札记](https://www.aeroacm.com/wp-content/uploads/2025/11/20251122230555682-图片6.png)
![图片[6]-SECTION IV – ASSEMBLY 5 -扭矩要求-航修札记](https://www.aeroacm.com/wp-content/uploads/2025/11/20251122230625725-图片7.png)
![图片[7]-SECTION IV – ASSEMBLY 5 -扭矩要求-航修札记](https://www.aeroacm.com/wp-content/uploads/2025/11/20251122230643855-图片8.png)
操作规程—管路与软管接头用流体和密封垫接头及特殊金属/锥形密封件的准备与安装
(1) Align tubing with fitting.
对齐管路与接头。
NOTE: Adjustments, which change the integrity of the tubing assembly, are not permitted. The sealing surface of a tube must never be drawn to a fitting with the tubing nut.
注意:严禁进行改变管路组件完整性的调整操作。切勿通过管路螺母将管件密封面拉向接头。
(2) Lubricate male threads and back sides of tubing nuts with oil (MIL-L-7808) or (MIL-L- 23699) lubricant.
用油(MIL-L-7808)或(MIL-L-23699)润滑剂润滑外螺纹及管螺母背面。
NOTE: Apply lubricants to male fitting only. Avoid line or sealing surface contamination with lubricant.
注意:仅在外螺纹接头处涂抹润滑剂。避免润滑剂污染管路或密封面。
(3) Engage threads with fingers before tightening.
拧紧前用手旋紧螺纹。
NOTE: If requirement cannot be met, parts shall remain rejected until reworked or replaced.
注:若无法满足要求,零件应保持报废(拒绝使用)状态直至返工或更换。
(4) Uniformly increase torque until the required torque is obtained.
均匀增加扭矩直至达到规定值。
CAUTION: DO NOT OVER-TORQUE TUBING OR CONNECTIONS AS A MEANS TO CORRECT LEAKS OR MISALIGNMENT.
注意:严禁通过过度拧紧管路或连接件来修正泄漏或错位。
(a) On tubing and connection fittings run the nut down to the required torque.
管路及连接件的螺母应按规定扭矩拧紧。
(b) On flared-type fittings, back off one-quarter turn, then retighten to the required torque.
扩口型接头需先松开1/4圈,再按要求扭矩重新拧紧。
(c) Where gaskets set slowly, briefly hold fitting at torque until the gasket has set.
密封垫缓慢成型时,需在达到扭矩后短暂保持接头位置直至密封垫完全成型。
CAUTION: DO NOT OVER-TORQUE TUBING OR CONNECTIONS AS A MEANS TO CORRECT LEAKS OR MISALIGNMENT.
注意:严禁通过过度拧紧管路或连接件来修正泄漏或错位问题。
(5) Apply final tightening of nuts to the required values using the following guideline. Values for aluminum alloy tubing shall apply in the following situations:
参照下列指南将螺母最终拧紧至规定值。铝合金管路在下列情况适用以下数值:
NOTE: Defective fittings are normally disassembled, checked, and replaced.
注:缺陷接头通常需拆卸、检查并更换。
• Aluminum alloy tubing is used with steel fittings.
• 铝合金管路与钢制接头配合使用。
• Aluminum alloy threaded parts are mated with steel threaded parts.
• 铝合金螺纹零件与钢制螺纹零件配合使用。
• Steel tubing is used with aluminum alloy fittings.
• 钢制管路与铝合金接头配合使用。
(6) For flared tube fittings 1.5 inch (38.1 mm) or larger eliminate sleeve bind-up on the tube during tightening.
对于1.5英寸(38.1毫米)及以上喇叭口管接头,紧固时需消除套管在管体上的卡滞现象。
(a) After tightening, back off nut and check sleeve for rotation.
紧固后松开螺母,检查套管是否转动。
(b) If the sleeve rotates, it is not defective. Final tighten the nut.
若套管可转动则无缺陷,可进行最终紧固。
(7) Assemble flared tubing and hose fitting connection. Refer to Figure 504.
组装喇叭口管件与软管接头连接。参照图504。
(a) Identify the required torque value.
确定所需扭矩值。
• For flared tubing or hose fitting connections (except conical seals) refer to Table 510.
• 喇叭口管件或软管接头连接(锥形密封件除外)参照表510。
• For fluid fittings used with ring seals or gaskets made of aluminum, asbestos, leather, or other similar types of material refer to Table 511 and Table 512.
• 配合铝制、石棉、皮革或其他类似材质环形密封件或密封垫的流体接头,参照表511和表512。
• For special metal seals tighten as specified. Refer to assembly manuals.
• 特殊金属密封件按规定要求拧紧。参见组装手册。
WARNING: DO NOT OVER-TORQUE ADJOINING FITTINGS OR DAMAGE MAY OCCUR.
警告:切勿过度拧紧相邻接头,否则可能造成损坏。
(b) Hold fittings and hose assembly nuts securely while applying specified torque. Refer to Figure 504.
施加规定扭矩时,牢固固定接头和软管组件螺母。参见图504。
![图片[8]-SECTION IV – ASSEMBLY 5 -扭矩要求-航修札记](https://www.aeroacm.com/wp-content/uploads/2025/11/20251122230827221-图片9.png)
(8) Assemble flareless tubing assembly.
组装无扩口管组件。
(a) Align assemblies so that tube ends are square with adjoining fittings.
对齐组件,使管端与相邻接头垂直。
(b) Lightly lubricate male threads of adjoining fittings with oil (MIL-L-7808) or (MIL-L- 23699) lubricant.
用油(MIL-L-7808)或(MIL-L-23699)润滑剂轻涂相邻接头的外螺纹。
NOTE: Allow the brackets that secure the tube assembly to the basic unit to remain loose until the tubing fittings are torqued.
注:在管接头拧紧前,固定管组装至基础部件的支架应保持松动。
(c) Install nut by hand until it engages the threads of male fitting and contacts sleeve.
手动旋入螺母直至其与外螺纹接头螺纹咬合并接触套管。
(d) Tighten the nut on the coupling to the specified torque value.
按规定扭矩值拧紧联轴器上的螺母。
• Tighten the nut on dynamic beam seal couplings in accordance with Table 513.
• 动态梁密封联轴器螺母按表513规定扭矩拧紧。
• Tighten the nut on flareless tube couplings in accordance with Table 514.
• 无扩口管接头螺母按表514规定扭矩拧紧。
![图片[9]-SECTION IV – ASSEMBLY 5 -扭矩要求-航修札记](https://www.aeroacm.com/wp-content/uploads/2025/11/20251122230906367-图片10.png)
![图片[10]-SECTION IV – ASSEMBLY 5 -扭矩要求-航修札记](https://www.aeroacm.com/wp-content/uploads/2025/11/20251122230922402-图片11.png)
![图片[11]-SECTION IV – ASSEMBLY 5 -扭矩要求-航修札记](https://www.aeroacm.com/wp-content/uploads/2025/11/20251122230952513-图片12.png)
![图片[12]-SECTION IV – ASSEMBLY 5 -扭矩要求-航修札记](https://www.aeroacm.com/wp-content/uploads/2025/11/20251122231011896-图片13.png)
![图片[13]-SECTION IV – ASSEMBLY 5 -扭矩要求-航修札记](https://www.aeroacm.com/wp-content/uploads/2025/11/20251122231027696-图片14-840x1024.png)
程序-在接头上准备与安装O型圈
(1) Apply small amount of oil (MIL-L-7808) or (MIL-L-23699) lubricant to the o-ring.
在O型圈上涂抹少量MIL-L-7808或MIL-L-23699润滑油。
(2) Install o-ring on fitting as shown in Figure 505, View A.
参照图505视图A将O型圈安装于管接头。
(3) Insert fitting assembly with installed o-ring into boss until it bottoms tightly as shown in Figure 505, View B.
将装有O型圈的管接头组装插入凸缘,直至如图505视图B所示紧密抵止。
![图片[14]-SECTION IV – ASSEMBLY 5 -扭矩要求-航修札记](https://www.aeroacm.com/wp-content/uploads/2025/11/20251122231316914-图片15.png)
程序-通用接头准备与安装
Proper preparation, assembled, and tightening of Universal Fittings involves preparing the fitting threads, installing the gasket, and tightening the fitting nut to the specified torque value.
正确准备、组装及拧紧通用接头需包含以下步骤:处理接头螺纹、安装密封垫,并将接头螺母拧紧至规定扭矩值。
(1) Assemble the nut onto the fitting, running the nut above the upper threads. (Refer to Figure 506, View A)
将螺母组装至接头上,使螺母位于上螺纹上方。(参见图506视图A)
(2) Apply a small amount of anti-seize lubricant to threads. (Refer to Table 503 to determine approved anti-seize lubricant.)
在螺纹上涂抹少量防咬剂。(参见表503确定合格防咬剂)
(3) Assemble o-ring against upper threads, making sure the packing is not twisted.
将O型圈组装于上螺纹处,确保密封无扭曲。
(4) Advance the nut until the top thread of the nut is flush with top thread of the fitting. (Refer to Figure 506, View B).
旋紧螺母直至其顶部螺纹与接头顶部螺纹齐平。(参见图506视图B)
(5) Assemble fitting into boss until o-ring lightly contacts boss. (Refer to Figure 506, View C).
将接头组装入凸台,直至O型圈轻触凸台。(参见图506视图C)
NOTE: If position of fitting is not correct, rotate it out slightly until the fitting is in proper position.
注:若接头位置不正确,可轻微旋转调整至正确位置。
(6) Tighten nut to specified torque value. Do not back it out more than one turn.
按规定扭矩值拧紧螺母。回转不超过一圈。
![图片[15]-SECTION IV – ASSEMBLY 5 -扭矩要求-航修札记](https://www.aeroacm.com/wp-content/uploads/2025/11/20251122231419641-图片16.png)
程序-隔板接头准备与安装
Boss application (refer to Figure 507(A) and Figure 507(B)):
凸台应用(参见图507(A)和图507(B)):
(1) Apply anti-seize lubricant to threads in accordance with Table 503.
根据表503要求在螺纹处涂抹防咬剂。
(2) Assemble jam nut on fitting, running jam nut past the o-ring groove.
将锁紧螺母组装至接头,使锁紧螺母穿过O型圈槽。
(3) Apply a very small amount of lubricant uniformly to the o-ring in accordance with Table 501.
根据表501要求在O型圈上均匀涂抹极少量润滑剂。
(4) Assemble the o-ring against the upper threads, making sure the o-ring is not twisted or rolled. Refer to Figure 507(A).
将O型圈组装至上螺纹处,确保O型圈无扭曲或卷曲。参见图507(A)。
(5) Advance the jam nut until its bottom is flush with the bottom of the top thread. Refer to Figure 507(A).
旋紧锁紧螺母直至其底部与上螺纹底部齐平。参见图507(A)。
(6) Assemble the fitting into the boss until the o-ring just contacts the boss. Refer to Figure 507(B). If the position (orientation) of the fitting is not correct, rotate fitting slightly until in correct position. Do not back out fitting more than one turn.
将接头组装入凸台,直至O型圈刚好接触凸台。参见图507(B)。若接头位置(方向)不正确,可轻微旋转接头调整至正确位置。切勿将接头逆向旋出超过一圈。
(7) Tighten the jam nut and torque in accordance with Table 510, Table 513 and Table 514 as applicable.
拧紧锁紧螺母,扭矩值参照表510、表513及表514(适用时)。
Bracket application (refer to Figure 507(C)):
支架应用(参见图507(C)):
(1) Apply anti-seize lubricant to threads in accordance with Table 503.
按表503要求在螺纹处涂抹防咬剂。
(2) Assemble fitting on bracket. Refer to Figure 507(C).
将接头组装至支架。参见图507(C)。
(3) Assemble jam nut hand-tight on fitting. Align fitting in correct position (orientation).
将锁紧螺母手工拧紧在接头上。确保接头处于正确位置(方向)。
(4) Connect tube or hose to fitting and tighten in accordance with Table 510, Table 513 and Table 514 as applicable.
将管路或软管连接至接头,并按表510、表513及表514(适用时)要求拧紧。
(5) Tighten jam nut on fitting in accordance with Table 510, Table 513 and Table 514 as applicable.
根据表510、表513和表514(视情况适用)拧紧接头上的锁紧螺母。
![图片[16]-SECTION IV – ASSEMBLY 5 -扭矩要求-航修札记](https://www.aeroacm.com/wp-content/uploads/2025/11/20251122231606321-图片17-818x1024.png)



暂无评论内容